
How to Weave in Ends So They Don't Pop Out
The duplicate-stitch principle that keeps woven ends locked in fabric, how far to weave for each fiber type, and the two mistakes that cause ends to surface in the wash.
On this page18 sections▾
Weaving in ends is one technique, not two. The crochet version and the knitting version share the same mechanic: thread the tail onto a tapestry needle, trace through the back of stitches in a path that doubles back on itself, trim flush. What changes between projects is how far you weave and how many times you reverse direction, and those depend on the fiber and the project's tension, not on whether you're holding a hook or two needles.
The technique only fails when one of two things is wrong. Either you wove parallel to the stitch line so the tail slides cleanly back out the way it came in, or you didn't weave far enough into a slippy synthetic to overcome the fiber's slick surface. Both are fixable once you understand what the weaving is actually doing.
The principle: duplicate stitch, but invisible
A woven end works because it follows the geometry of the surrounding stitches and locks itself in place by friction. The standard move is to trace the back of one row of stitches, then reverse direction and trace through different stitches on the way back. Tail goes in, doubles back, comes out at an angle to where it entered.
The reverse is the structural step. A straight-line weave with no reverse can be pulled back out with light tension; the yarn just slides through the path it carved. The reverse forces the tail to negotiate two opposing paths, and the friction between the tail and the surrounding stitches holds it.
This is the same principle as duplicate-stitch grafting, just used to hide a tail instead of to add a stitch.
How to do it: the standard sequence
-
Thread the tail onto a tapestry needle. Sizes 18 to 22 cover worsted through fingering; match the eye to the yarn weight so the needle passes through stitches without distorting them.
-
Working on the wrong side, run the needle horizontally through the bumps and loops at the back of one row of stitches. Stay on the wrong side; do not let the needle pass through to the front. For knit stockinette, you're weaving through the purl bumps. For single crochet, you're weaving through the horizontal back bars.
-
Go 1.5 to 2 inches in one direction. Two inches is the default; thinner yarn needs the full two.
-
Pull the needle out, rotate the tail, and weave back about half an inch through stitches in a slightly different row. Different row is the structural point. If you weave back through exactly the same row you came from, you've made a straight line that won't lock.
-
Trim flush, leaving about a quarter inch of tail sticking out. The quarter inch retracts into the fabric after the first wash and disappears.
That's the whole sequence. Five steps, repeats identically for every end in the project.
Why parallel weaving fails
The most common cause of an end popping out is weaving parallel to the stitch column rather than across it. Parallel weaving slots the tail into the natural channel between two stitch columns; once it's in there, light tension at the trimmed end (a snag on a sleeve, a tug from a washing machine) can extract the entire tail.
The fix is to weave at a slight angle to the stitch direction, or to weave horizontally across stitch columns rather than along them. The tail then has to cross multiple stitches' worth of yarn to escape, and the friction is enough to hold it.
For knit stockinette, the easiest non-parallel path is along a purl ridge on the wrong side. For crochet, the horizontal back bars are already perpendicular to the stitch columns, so just weaving horizontally is enough.
Fiber-specific adjustments
Different fibers grip themselves at different strengths. The weaving distance and reverse count adjusts accordingly.
Wool. Wool fibers have scales that catch on each other. One reverse is usually enough; the wool will felt slightly to itself in the first wash and lock the end permanently. Two inches in one direction, half an inch back, trim.
Superwash wool. Superwash has been treated to remove the scales (that's how it survives the washing machine without felting). It behaves like a slick synthetic for the purpose of weaving. Weave further (2.5 to 3 inches) and reverse twice.
Acrylic. Slick. Weave 2.5 to 3 inches in one direction, reverse half an inch, then reverse again half an inch in another row. The three-segment path is what holds acrylic; one reverse is not enough.
Cotton and linen. Inelastic but moderately grippy. Two inches with one reverse is fine for cotton; linen wants 2.5 inches because the fibers are slicker.
Mohair and any halo yarn. The fuzz holds the tail by itself. Two inches is plenty, one reverse is sufficient, and the woven section is almost impossible to find afterward because the halo covers everything.
The crochet hook trick for short ends
If a tail is too short to thread on a tapestry needle (anything under three inches is awkward), use a small crochet hook to drag the tail through the back of stitches instead.
Insert the hook through a stitch on the wrong side from the direction you want the tail to exit. Catch the tail with the hook. Pull the tail through the stitch. Move to the next stitch and repeat. The hook lets you work with a tail you'd otherwise have to give up on.
This is faster than threading a needle even for normal-length tails. Many crocheters use the hook method exclusively. Knitters tend to default to the tapestry needle but the hook works fine for knit fabric too.
When to weave during the project vs after
Two camps. Weave-as-you-go knitters and crocheters tuck in tails at every color change before continuing; weave-at-the-end people leave a basket of trailing tails and deal with them all once the project is done.
The argument for as-you-go: you don't end up with a 200-tail blanket sitting in a basket for two months because the prospect of weaving them in is depressing. Each tail takes 30 seconds in context, and you never lose track of which tail belongs to which color section.
The argument for the end: tails get in the way of pattern reading, can pull loose if accidentally tugged during further crocheting, and color changes go faster if you don't break rhythm to weave.
Practical answer: weave as you go on projects with many color changes (granny square blankets, Fair Isle, anything striped). Weave at the end on plain garments or anything where you only have to deal with the cast-on and bind-off tails plus maybe one yarn join.
Color changes that fall mid-row
Mid-row color changes in single crochet or stockinette create a tail on each side of the change: the old color's tail on the right, the new color's tail on the left. Weave each tail into its own color's section. Weaving the green tail into red stitches makes the green tail visible through the red yarn at certain angles.
If both colors are saturated and similar in value, weaving direction matters less; you can weave in either color and the contrast won't read. If one color is much lighter than the other (white on navy, for example), the wrong-color tail will show. Always weave into matching-color stitches when possible.
Two practice projects with lots of ends
The fastest way to learn this technique is on a project with many color changes. Plain garments give you four ends to weave in (cast-on, bind-off, one yarn join, the seam tail). A multicolor blanket gives you twenty or fifty, which is enough repetition for the motion to become automatic.
Cosy Stripe Blanket (crochet)

Find this pattern on HoneyBee
Lucy of Attic24. DK weight, 4mm hook. Worked flat in striped rows using fifteen Stylecraft Special DK shades; each color change leaves a tail at the edge, which means somewhere around thirty ends to weave in once the blanket is done. Lucy's blog walks through the color order, but the construction couldn't be simpler. The teaching value is the repetition: after thirty tails you stop thinking about the move and just do it. Cotton-blend or pure acrylic both work in this pattern; if you go acrylic, weave at least 2.5 inches with two reverses per tail.
Dream Stripes (knit)
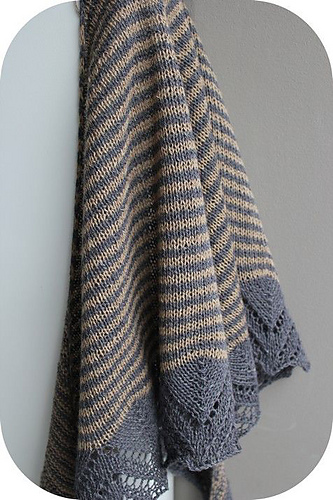
Find this pattern on HoneyBee
Berangere Cailliau. Fingering weight, US 6 needles. Two-color garter-stripe shawl, top-down crescent shape. Fingering is where weaving technique starts to matter; the yarn is thin enough that an undertight weave will pop out after one block, so this is a good project to practice the 2.5-inch double-reverse on. Each stripe break is a tail; for a typical Dream Stripes shawl you'll deal with eight to twelve color-change tails plus the cast-on and bind-off. Block-test by giving each woven tail a deliberate tug after blocking. If any move, reweave them.
Common mistakes
Weaving with a too-long tail and getting tangled. Trim tails to six inches before threading the needle. Trying to weave with twelve inches of tail is the main cause of accidentally pulling the tail back out partway through, and it doesn't make the weave more secure; weaving anchors in the first two inches regardless of how much tail you started with.
Trimming too close to the fabric. A tail trimmed flush at the surface can slip back through the entrance hole. Leave a quarter inch sticking out; it retracts in the first wash and the woven section stays locked.
Weaving on the front by mistake. On garter stitch, both sides look identical and it's possible to weave the tail on the public side without noticing. Mark the wrong side with a removable stitch marker before weaving any garter project.
Reversing through the same row. The reverse has to go through different stitches than the forward pass. Same row reverse is a straight line; the tail can be pulled back out.
Skipping the reverse on acrylic. Acrylic without a double-reverse will work loose. The fiber doesn't grip itself. The reverse is the structural step regardless of fiber, but on acrylic it's the only thing holding the tail.
FAQ
How short can a tail be before it's too short to weave?
About 1.5 inches. Below that, the tapestry needle won't accept enough yarn to weave through 2 inches of fabric, and the crochet hook trick stops working because you can't catch the tail securely. If you have a sub-1.5-inch tail, your options are to undo the last stitch and pick up an extra inch (works for knit; harder for crochet) or to accept that you'll have a visible end.
Should I use the project yarn or a thinner yarn for weaving?
Project yarn. The weave-thru is supposed to match the surrounding stitches' weight; a thinner weaving yarn won't lock and a thicker one will distort the fabric. The only exception is mohair or fuzzy yarns, where weaving with a smooth thread of similar color is sometimes easier and the halo hides it anyway.
Does fray check actually work?
It works on the last quarter inch of an already-woven end, used as belt-and-suspenders insurance on a project that will be washed roughly. It does not substitute for proper weaving. Putting a dab of fray check on a one-inch poorly-woven tail will make the tail rigid but the end will still pull out under tension. Weave first, fray-check second if at all.
What about magic knots and Russian joins?
Both join two strands of yarn at the start or end of a color section, with no tails to weave. They work; they're popular shortcuts. The catch: a knot or join is a hard spot in the yarn, and the knot becomes the failure point if the project gets stress in that area. Fine for blankets and most accessories; risky in sock heels or sweater armholes. Most experienced knitters use them on low-stress projects only and weave traditional ends in fitted garments.
Why do my ends pop out in the wash?
Two likely causes. Either you wove parallel to the stitch direction (and the tail walks out cleanly through its own channel) or you wove a slick fiber without enough reverses. Both fail the same way and look the same after the wash, so try the structural fix first: pull all your woven ends back out, reweave horizontally across the stitch columns with a double reverse, and retest.
Related guides
- How to Change Colors in Knitting
- How to Change Colors in Crochet
- How to Block Your Knitting and Crochet
- How to Read a Crochet Pattern
- How to Read a Knitting Pattern
For yarn-weight conventions (which determine the tapestry-needle size you should reach for), the Craft Yarn Council's yarn weight system is the universal reference.
Two inches in, half an inch back, trim. Thirty times on a Cosy Stripe Blanket and the move is yours.
More from the HoneyBee blog
Pattern round-ups, tutorials, and crafting inspiration from the HoneyBee community.
Read more articles