
Crochet Oval Pattern: Rugs, Baskets and More
Learn how to crochet oval shapes with step-by-step instructions. 10 free oval rug, basket, and placemat patterns for home decor.
On this page20 sections▾
An oval shape is one of the most useful forms in crochet. Oval rugs anchor a room. Oval baskets organize your stash. Oval placemats add elegance to your table. What makes ovals so versatile is their flexibility: they work in any size from tiny to room-sized, and they're forgiving enough for beginners yet offer enough room for creative variations. In this guide, we'll walk you through how to crochet an oval shape from the ground up, then showcase 10 gorgeous free patterns featuring oval rugs, baskets, placemats, and more so you can find the perfect home decor project.
Why Oval Shapes in Crochet?
Ovals are the practical cousin of circles. Where circles work best as flat, centered motifs, ovals fit into real-world spaces. They're the shape of a rug that anchors a living room. They're the shape of a basket that holds your yarn stash without rolling off a shelf. They're the shape of a placemat that sits perfectly on a rectangular table.
The crochet oval pattern is foundational because it teaches you principles that extend to many projects. Once you understand how to shape an oval, you can modify the technique for different sizes, stitch patterns, and purposes. It's one of those magical crochet skills that opens doors.
How to Crochet an Oval Shape
Creating a smooth oval is simpler than you might think. The key is understanding how to increase at the right points to maintain an even shape.
Step-by-Step Oval Construction
1. Start with a Foundation Chain Unlike circles which start in the center, ovals typically begin with a straight chain. This chain forms the straight sides of your oval. For a small oval, try a chain of 8 to 12. For a larger rug or placemat, you might chain 20 to 30 stitches.
2. Work Up One Long Side Skip a stitch, then work single crochet (or your chosen stitch) along the back bumps of the chain. Work all the way to the end. You now have one side of your oval going.
3. Make a Turn at the End At the last chain stitch, you'll work multiple stitches into that one stitch. This creates the rounded end of your oval. Typically, you work 3 stitches into that corner stitch. This is where the shaping happens.
4. Work Down the Opposite Side Now you'll work back along the opposite side of your foundation chain. Work one stitch in each chain stitch until you reach the other corner.
5. Shape the Opposite End Work 3 stitches into that corner stitch to create the rounded end. You've now completed one round and created your basic oval shape.
6. Continue in Rounds From here, you can work continuous rounds (with slip stitch to join) or spiral rounds (without joining, just round and round). Increase at the ends of your oval each round to maintain the shape as it grows. Increase stitches along the sides as well. A common pattern is to increase one stitch on each side of the end rounds, and one to two stitches along the long sides each round.
7. Keep Your Edges Smooth The key to a smooth oval is consistent increasing. Mark your increase points and maintain them as you grow your piece. As your oval gets larger, you might place increases at every other row on the long sides and every round at the ends.
Pro Tips for Perfect Ovals
Blocking is your friend with ovals. A wet block helps even out any inconsistencies in your increases and gives your finished piece a polished look. Pin it to shape, let it dry, and you'll see the magic.
Keep your tension consistent. Loose tension in some spots and tight in others will create lumpy, uneven edges. Practicing consistent tension is one of the best investments you can make in your crochet.
Pay attention to where you're increasing. Too many increases in one spot will create ripples and waves. Too few will make the edges cup. Find your sweet spot by checking your work as you go.
The Math Behind Ovals
If you want to get technical about ovals, they're essentially two half-circles connected by straight lines. Your corner increases create those half-circles, while your straight sides are just even increases. Understanding this helps you troubleshoot when something looks off.
The increases don't need to be perfectly scientific. Many successful oval patterns use simple rules like "increase one stitch per round at each end" or "increase every other row along the sides." These simple rules create beautiful results because crochet has built-in forgiveness. Small variations don't break the shape.
10 Free Crochet Oval Patterns
Waistcoat Basket
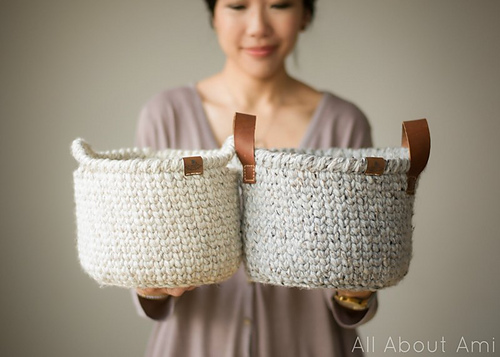
Find this pattern on HoneyBee
Stephanie Jessica Lau's Waistcoat Basket is a practical storage solution with gorgeous texture. The waistcoat stitch (also called center single crochet) creates a beautiful, refined look. This beginner-level pattern works in super-bulky yarn, so it comes together quickly. You can add leather or crochet handles to make it even more special. At over 12,000 saves, this is clearly a favorite.
Skill Level: Beginner | Yarn Weight: Super-Bulky | Techniques: Waistcoat stitch, video tutorial
Mini Rings of Change
Frank O'Randle's Mini Rings of Change is a shortened version of a classic circular design that creates stunning color and pattern variations. Though worked in the round starting from the center (like a giant doily), the principles apply to oval construction. This intermediate pattern is perfect for studying how to expand a shape evenly. Worked in aran weight, it's a substantial project.
Skill Level: Intermediate | Yarn Weight: Aran | Techniques: Circle, increases
Jessie Stash Basket
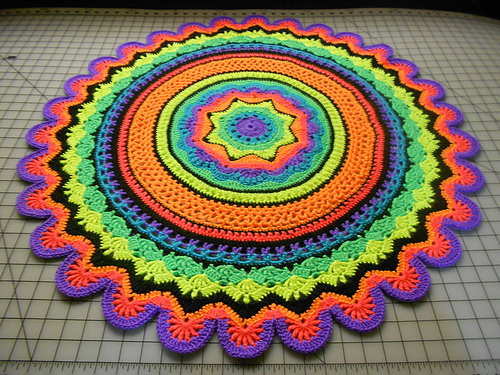
Find this pattern on HoneyBee
Toni Lipsey's Jessie Stash Basket uses textured stitches worked flat to create a rectangular basket, but the construction principles apply to oval baskets. This beginner pattern is worked with two strands of super-bulky yarn, creating something chunky and fast. The textured appearance hides stitch inconsistencies, making it forgiving for learners. The video tutorial adds confidence.
Skill Level: Beginner | Yarn Weight: Jumbo | Techniques: Textured, flat construction, video tutorial
Gorgeous Mandala Floor Rug
Marinke Slump's Gorgeous Mandala Floor Rug is a showstopper. This beginner-friendly circular design is worked flat with textured stitches and uses t-shirt yarn for durability. While circular rather than oval, the stitch principles and increasing patterns teach everything you need to know about expanding shapes. The photo tutorial makes every step clear.
Skill Level: Beginner | Yarn Weight: Super-Bulky | Techniques: Circle, textured, photo tutorial
Mosaic Basket

Find this pattern on HoneyBee
Rebecca Langford's Mosaic Basket is a work of art. The two-color mosaic technique creates the appearance of hand-painted design, and the basket is worked in the round from the bottom up. This beginner pattern shows how simple stitch choices with color changes create stunning visual impact. No seaming required, making it accessible for beginners.
Skill Level: Beginner | Yarn Weight: Bulky | Techniques: Mosaic, worked in the round, 3D, video tutorial
Diamond Trellis Basket
Esther Chandler's Diamond Trellis Basket combines function and elegance. Worked in the round from the base up with post stitches for structure, this intermediate pattern shows how to use increases to create a basket shape. The textured surface and geometric pattern make it beautiful enough to display. No seaming means a finished look you'll love.
Skill Level: Intermediate | Yarn Weight: Bulky | Techniques: Post stitch, textured, worked in the round
Basket Weave Afghan Baby Blanket
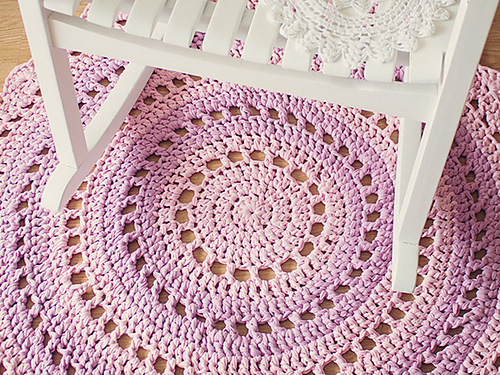
Find this pattern on HoneyBee
Joanne Loh's Basket Weave Afghan shows how post stitch basket weave pattern creates visual depth. Though a blanket rather than a basket, the construction is worked flat with increases and the stitch choice creates texture. This beginner pattern teaches how to create interesting surfaces without complicated colorwork. Perfect for studying even shaping.
Skill Level: Beginner | Yarn Weight: Aran | Techniques: Post stitch basket weave, worked flat, photo tutorial
Bowl Cozy Hot Pad
Amy B Stitched's Bowl Cozy is small but mighty. This beginner-level project is worked in the round and creates an oval-ish shape. Perfect for understanding increases on a small scale, it's a quick project that teaches fundamental shaping. The pattern is simple enough for beginners but the results are practical and adorable.
Skill Level: Beginner | Yarn Weight: Worsted | Techniques: Worked in the round, basic increases
Flower Accent
Mimi Alelis' Flower Accent is a delightful mini project with an oval-shaped center hole. Though small, it teaches circular construction and shaping. The three-dimensional petals show how stitches can create structure without increasing complexity. It's beginner-friendly and charming.
Skill Level: Beginner | Yarn Weight: Thread | Techniques: Circle, 3D, worked in the round
Starlight Basket
Toni Lipsey's Starlight Basket combines chunky yarn, simple construction, and textured design for something special. Worked in the round with sturdy handles and a textured fabric, this beginner pattern creates a basket that's both functional and beautiful. The super-bulky yarn means quick progress, and the video tutorial walks you through every step.
Skill Level: Beginner | Yarn Weight: Super-Bulky | Techniques: Textured, worked in the round, video tutorial
Ovals for Home Decor
Ovals bring elegance to any room. A crochet oval rug grounds a seating area. Ovals on shelves hold supplies and look intentional. Place an oval placemat under a vase, and suddenly your table styling looks curated. The beauty is that ovals work in any color, with any stitch, at any size.
Check out our home decor collection for more projects that bring handmade warmth into your living space.
Yarn Weights for Oval Projects
The yarn weight you choose determines your finished product's function and appearance. Super-bulky yarns create fast projects in baskets and rugs. Aran and worsted weights offer a middle ground. Fingering weights create delicate, lacy ovals suitable for doilies or fine storage solutions.
For home decor ovals, consider durability. A rug underfoot needs sturdy yarn and tight stitching. A decorative doily can be more delicate. A basket that holds supplies should be semi-sturdy.
Color matters too. Solid yarns show off stitch texture beautifully. Variegated yarns add visual interest but can hide delicate stitch work. Multi-color or striped effects work well with simple stitches.
Frequently Asked Questions
What's the difference between a crochet oval and a circle? Ovals have two rounded ends connected by straight sides. Circles are rounded all the way around. Ovals are more practical for home decor because they fit rectangular spaces better.
Can I make an oval any size? Absolutely. The basic principle scales up or down. A tiny oval in thread weight works as a coaster applique. A giant oval in super-bulky becomes a statement rug. Start with the foundation chain length and adjust your increasing rounds accordingly.
How do I know if my oval is shaping correctly? Check your work frequently. Every few rows, measure the length and width. They should both be growing. The length should grow more slowly than you might expect, while width grows more quickly. If the length isn't growing, you need more increases along the sides.
What stitches work best for ovals? Single crochet creates dense, sturdy bases. Double crochet works quickly. Textured stitches like waistcoat or post stitches add visual interest. Lacy stitches create delicate effects. Any stitch can work. Choose based on the look you want and the yarn you're using.
Can I block an oval to perfect its shape? Yes. Blocking is especially helpful for ovals. Pin your finished piece to the desired shape on a blocking mat, wet it, and let it dry. This sets your stitches and smooths out any irregularities.
Do I need a pattern to make an oval? Not necessarily. If you understand the basic principle of increasing more at the ends than the sides, you can improvise an oval from scratch. That said, following an established pattern ensures success on your first try.
Start Your Oval Project
Now you have the knowledge to crochet ovals from scratch or follow a detailed pattern. Whether you choose a humble basket to hold supplies or an ambitious floor rug to anchor a room, you're creating something that brings both beauty and function to your home. Pick a pattern that calls to you, choose yarn in colors that make you happy, and start stitching. Your oval project is waiting.
More from the HoneyBee blog
Pattern round-ups, tutorials, and crafting inspiration from the HoneyBee community.
Read more articles