
Crochet Edging Stitches: Beautiful Borders for Blankets
Master crochet edging and border stitches for blankets. Learn techniques to add beautiful, professional finishes to your projects with step-by-step tutorials.
On this page37 sections▾
A blanket is only as polished as its edges. Even the most beautifully crocheted body can feel unfinished without a thoughtful border. The right edging transforms a simple blanket into something special, adding dimension, stability, and visual appeal. Whether you're a beginner ready to try your first decorative edge or an experienced crocheter looking to expand your border repertoire, this guide covers essential crochet edging stitches, how to apply them, and how to choose the perfect finish for your project.
Why Blanket Edging Matters
Before we dive into specific stitches, let's talk about why edging is worth the time and effort.
Structure: A well-executed edge prevents your blanket from curling or rolling, keeping it flat and stable even after multiple washes.
Visual Impact: An edging frames your blanket beautifully, drawing attention to the colors and stitch patterns you've worked so hard to create.
Completion: An edge transforms a blanket from "work in progress" to "finished project." There's real satisfaction in knowing every element is intentional.
Professional Appearance: A thoughtful border separates handmade blankets from hastily finished projects, giving yours the polish of a designer piece.
Functionality: Some edges add warmth or durability. A picot edge adds delicacy; a solid shell edge adds strength.
Essential Crochet Edging Stitches
Single Crochet Edge (The Foundation)
The simplest edging, but don't underestimate it.
Construction:
- Attach yarn to a corner
- Work 1 single crochet into each stitch along the edge
- At corners, work 2-3 single crochets into the same stitch to turn smoothly
- Fasten off
Best For: Minimalist blankets where the body stitch pattern is the star. Works beautifully in contrasting or matching yarn.
Pro Tip: Single crochet edge can sometimes look sparse. Double it by working two rounds if desired.
Slip Stitch Crochet Edge (Seamless and Neat)
Creates an almost invisible edge that secures your blanket.
Construction:
- Attach yarn at a corner
- Work slip stitches along each edge
- When crocheting around the edge, work slip stitch by inserting hook, yarning over, and pulling through immediately (no chain)
- At corners, chain 1 and continue
Best For: Blankets where you want the edge to recede visually. Creates a refined, modern look.
Double Crochet Edge (Texture and Height)
Adds visible dimension without complexity.
Construction:
- Attach yarn at a corner
- Chain 1
- Work 1 double crochet into each stitch along the edge
- At corners, chain 2 and continue
- Join with slip stitch if working in rounds
Best For: Medium-weight blankets where you want subtle texture. Works in contrasting colors for visual pop.
Shell Stitch Edge (Elegant and Classic)
A shell is multiple stitches worked into the same stitch, creating a fan-like appearance.
Construction:
- Attach yarn at a corner
- Skip 1 stitch
- Work (1 double crochet, chain 1, 1 double crochet, chain 1, 1 double crochet) into the next stitch
- Skip 1 stitch
- Repeat along the edge, adjusting spacing at corners
Best For: Delicate, vintage-style blankets. Creates beautiful dimensionality and frames baby blankets beautifully.
Picot Edge (Decorative and Whimsical)
Picots are tiny loops that add delicate detail.
Construction:
- Attach yarn at a corner
- Work 3 single crochets along the edge
- Create a picot: chain 3, then slip stitch into the first single crochet just completed
- Repeat: 3 single crochets, then 1 picot
- Continue around the blanket
Best For: Baby blankets, gift blankets, and anywhere you want a touch of whimsy. Picots catch light beautifully.
Bobble or Popcorn Edge (Playful and Textured)
Creates chunky, three-dimensional details.
Construction:
- Attach yarn at a corner
- Work 2 single crochets along the edge
- Create a bobble: work 5 double crochets in the next stitch, remove loop, insert hook in first double crochet, re-thread loop through
- Repeat: 2 single crochets, then 1 bobble
- Continue around
Best For: Fun, casual blankets. This edge adds personality and visual interest. Works beautifully on colorful blankets.
Lace Edge (Romantic and Intricate)
Uses chains and open spaces for an airy feel.
Construction:
- Attach yarn at a corner
- Work 1 single crochet
- Chain 2, skip 1 stitch
- Repeat chain 2, skip 1 pattern
- At the end of each chain section, work a single crochet before chaining again
- At corners, chain 3 or 4 for smoother turning
Best For: Elegant, heirloom-style blankets. Lace edges frame garter stitch or simple pattern blankets beautifully.
Picking Up Stitches for Your Edging
Before you start your edge, you need to work into the existing stitches of your blanket. Here's how:
Along Bound-Off Stitches (Top and Bottom)
This is straightforward. Each stitch has a clear loop at the edge.
- Attach yarn with a slip knot
- Work into the loop of each bound-off stitch
- For a fuller edge, you can work 2 stitches for every bound-off stitch if needed
Along Side Edges
Side edges can be tricky because you're working through row ends, not individual stitches.
- Count your rows and determine how many stitches you'll work
- General rule: work 3 stitches for every 4 rows (this prevents ruffling)
- Distribute stitches evenly, working slightly more densely at corners
- If the blanket edges are loose, work through both loops. If tight, work through just the back loop
At Corners
Corners require special attention so your edge turns smoothly.
- At each corner, work an extra stitch (or 2-3 for bulkier stitches)
- Alternatively, work your corner stitch, chain, and continue in the next direction
- Test the first corner before committing to the whole edge
Edging Patterns from HoneyBee
Looking for inspiration? These blanket patterns showcase beautiful edging techniques:

Find this pattern on HoneyBee
Celeste Young's Rainbow Ripple Baby Blanket features stripes and a ripple pattern that pairs beautifully with a simple single crochet or shell stitch edge. The blanket's movement is complemented by gentle edging that frames without overshadowing.

Find this pattern on HoneyBee
Sandra Paul's Battenberg Blanket uses modular squares that are seamed together. This construction means the edge is built-in as you join squares. The pattern includes photo and video tutorials showing how the joining creates the finished edge.
Find this pattern on HoneyBee
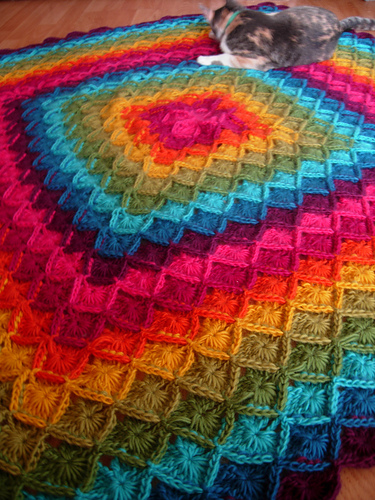
Sarah London's Wool Eater Blanket is crocheted in the round from the center out, meaning the edge is naturally integrated into the construction. If you're looking to avoid adding a separate border, this approach is elegant.

Find this pattern on HoneyBee
Jeanne Steinhilber's Hugs & Kisses features bobbles and ripples. The pattern includes a video tutorial, making it perfect for learning both the construction and the best edge finish.
Check out Beautiful Shells Blanket for more inspiration.
Lahoma Jayne Nally's Beautiful Shells Blanket works in the round with shell-stitch elements. This pattern is a masterclass in how shell stitches throughout the design can be echoed in the edge.
Check out Frida's Flowers Blanket for more inspiration.
Jane Crowfoot's Frida's Flowers features motifs that inspire decorative edge treatments. A picot or shell edge frames the floral design beautifully.
Step-by-Step Edging Application
Planning Your Edge
Before picking up stitches, decide:
- Style: Choose from the stitches above based on your blanket's aesthetic
- Color: Will you use the same yarn or add contrast?
- Width: Will the edge be one round or multiple rounds?
- Texture: Does your edge echo or contrast the blanket body?
Executing Your Edge
Step 1: Prepare Your Blanket
- Block your blanket gently if needed
- Pin it to a comfortable working surface if it's very large
- Ensure corners are as square as possible
Step 2: Attach Your Yarn
- Choose a corner to start
- Use a slip knot to attach your yarn
Step 3: Pick Up Stitches
- Work along the top edge first, distributing stitches evenly
- At the corner, work extra stitches or chain to turn smoothly
- Continue down the right side
- Turn at the next corner
- Continue along the bottom edge
- Finish along the left side
- Join to the first stitch with a slip stitch
Step 4: Work Your Edging Stitch
- Follow your chosen edging stitch construction
- Maintain even tension throughout
- Step back occasionally to check that your edge is even and aligned
Step 5: Finish
- Fasten off securely
- Weave in ends
- Block gently if desired to even out the edge
Color and Design Considerations
Matching Colors
A matching-yarn edge frames without distracting. Perfect for:
- Multicolor blankets (edge in a neutral that appears in the pattern)
- Solid blankets where you want a cohesive look
- Delicate lace patterns you want to highlight
Contrasting Colors
A contrasting edge creates visual separation and movement. Perfect for:
- Simple-pattern blankets that need visual interest
- Blankets made in variegated yarn (a solid edge provides relief)
- Modern, graphic designs
- Baby blankets (where a contrasting edge makes the blanket "pop" in photos)
Tonal Effects
Using a shade lighter or darker than your blanket creates subtle depth:
- Light blanket + darker edge = sophisticated, grounded
- Dark blanket + lighter edge = airy, framable
- Variegated blanket + solid edge in one of the colors = cohesive
Troubleshooting Common Issues
Problem: Ruffle at the Edge
Cause: Too many stitches worked along the edge.
Solution: Work fewer stitches. Follow the 3-for-4-rows rule on side edges. For top and bottom, work 1 stitch per bound-off stitch unless the blanket seems to want more.
Problem: Puckering at Corners
Cause: Not enough stitches at corners to accommodate the turn.
Solution: Increase corner stitches. For tight edges, work 3-4 stitches into the corner. For shell edges, work an extra shell.
Problem: Edge Looks Uneven
Cause: Inconsistent stitch tension or uneven stitch distribution.
Solution: Practice on a swatch first. Count stitches carefully before working. Block the finished edge gently to even tension.
Problem: Edge Separates from the Blanket
Cause: Yarn too thin relative to blanket, or stitches too loose.
Solution: Use a yarn weight that matches the blanket. Work slightly tighter than normal. If using thin yarn, work two rounds of edging.
Problem: Edge Won't Lay Flat
Cause: Often too-tight edging or yarn shrinkage in blocking.
Solution: Before final blocking, wet-block your blanket to relax tension. Avoid over-blocking the edge.
FAQs
Do I have to add an edging to my blanket?
No. Many beautiful blankets are finished with just a bind-off. However, edging stabilizes edges, prevents curling, and adds polish. Even a simple single crochet edge makes a noticeable difference.
Can I add edging to an already-finished blanket?
Absolutely. If you finished a blanket months ago and now want to edge it, you can. Just pick up stitches along the existing edge. The blanket will need a light blocking afterward, but it's entirely doable.
How much extra yarn do I need for edging?
It depends on the blanket size and edge complexity. A simple single crochet edge on a baby blanket might use 50-100 yards. A decorative shell or lace edge on a large throw could use 300+ yards. Always have extra yarn on hand.
What if my edging yarn is thinner than my blanket yarn?
You can use thinner yarn, but you'll likely need to work multiple rounds of edging so it doesn't look sparse. Alternatively, use the thinner yarn for a delicate lace edge effect.
Can I combine multiple edging stitches?
Yes! Many beautiful edges combine stitches. For example: one round of single crochet, then one round of shells, then one round of picots. Test on a swatch first to ensure they work together visually.
How do I edge a blanket made of different stitch patterns?
Work a uniform edge that complements the whole blanket. An edge that echoes one aspect (like the colors or the general texture level) usually works best. Avoid an edge so complex it competes with the blanket body.
Should I block my blanket before or after edging?
Both approaches work, but here's the strategy:
Light block before edging: Makes picking up stitches easier and ensures corners are square.
Final block after edging: Allows you to even out both the blanket and edge together, ensuring they finish at the same tension.
Many crocheters do a light block before edging, then a final block after.
What's the difference between edging and border?
Edging is worked along the finished edge of the blanket, picking up stitches from existing stitches.
A border is typically worked separately and sewn on, or requires picking up from the bind-off row in a specific way. Borders are often more structured; edging is more flexible.
For most blankets, edging is the more practical approach.
Perfect Your Finish
The edging is where good blankets become gorgeous ones. A thoughtful, well-executed border transforms your finished project and shows the care you invested in its creation. Whether you choose a simple single crochet edge or an elaborate lace border, your blanket will be more beautiful, more stable, and more treasured.
Head to HoneyBee to explore blanket patterns that inspire you and discover new edging techniques from designers worldwide. Your next favorite blanket is waiting to be started.
Happy crocheting!
More from the HoneyBee blog
Pattern round-ups, tutorials, and crafting inspiration from the HoneyBee community.
Read more articles