
Cable Knit Leg Warmers and Essential Knitting Stitch Patterns
Master cable knitting, learn essential stitches, and explore free patterns for leg warmers and classic knitting techniques.
On this page30 sections▾
Cables are one of knitting's most visually dramatic techniques, and there's something uniquely satisfying about watching flat yarn transform into three-dimensional rope-like textures. For new knitters intimidated by cable work, leg warmers are an ideal project: they're small enough to finish quickly, forgiving of mistakes, and genuinely useful once you're done.
Whether you're learning cables for the first time or looking to refresh the fundamentals of knitting stitches, we've gathered patterns, techniques, and tips to get you confidently working with cables and mastering the essential stitches that form the foundation of all knitting.
Essential Knitting Stitches
Before you tackle cables, let's ground ourselves in the fundamentals. Every knitting pattern, no matter how complex, is built from these basic building blocks.
The Knit Stitch
The knit stitch (k) is the foundation. You insert your needle from left to right, wrap yarn around, and pull through. The result is a "V" shape that makes up the stockinette stitch when you alternate with purl rows.
Stockinette Stitch - alternating knit and purl rows (or knit in the round) creates this smooth, classic fabric. It's the most common base for other stitches.
The Purl Stitch
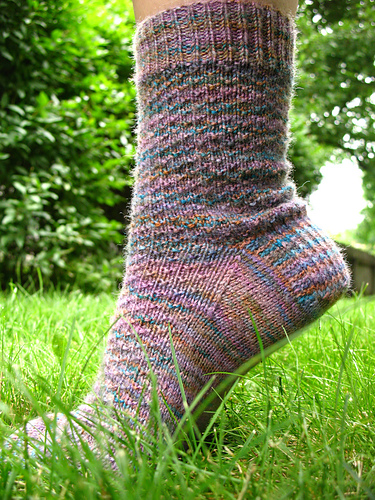
Find this pattern on HoneyBee
Purl (p) is the reverse of knit. You insert from right to left, wrap yarn, and pull back. On their own, repeated purl rows create bumpy, textured fabric. Purl stitches between knit stitches add dimension.
Garter Stitch
Knit every row. The result looks bumpy on both sides and creates a reversible, squishy fabric. Perfect for beginners, leg warmers, and anything that needs simple elegance.
Rib Stitches
Alternating knit and purl stitches in the same row (k1p1, k2p2, etc.) creates the stretchy ribbing you see on sweater cuffs, hat rims, and sock tops. This elasticity makes ribbing essential for anything that needs to grip.
Slip Stitch (sl)

Find this pattern on HoneyBee
Slip a stitch from one needle to the other without knitting into it. This technique creates clean edges, helps with colorwork, and enables cool shaping tricks. The Honey Cowl uses slipped stitches to create beautiful texture without complex maneuvers.
Introduction to Cable Knitting
Cables are created by temporarily holding stitches to the side (on a cable needle), knitting the next stitches, then knitting the held stitches. This crossing creates the rope-like pattern.
Basic Cable Mechanics
A simple cable might work like this:
- Slip 2 stitches onto a cable needle
- Knit the next 2 stitches normally
- Knit the 2 stitches from the cable needle
- Continue as normal
The 2x2 cable (abbreviated C2B for "cable 2 back" or C2F for "cable 2 front") is the simplest variation. You're essentially weaving stitches over and under each other.
Cable Needle Choices
You can use a dedicated cable needle or improvise with a toothpick, spare knitting needle, or even a paperclip. Some people prefer larger cable needles for easier maneuvering, others like needles close in size to their working needles. Experiment to find what feels comfortable.
Reading Cable Patterns

Find this pattern on HoneyBee
Cable patterns are often given in both written instructions and charts. Charts are actually easier for cables because each square shows you exactly which stitches to cross and in which direction. The visual representation helps you understand the three-dimensional structure.
Cable Progression
- 2x2 cables - simplest, create narrow ropes
- 3x3 cables - more substantial, classic look
- 4x4 cables - thick, dramatic ropes
- Twisted cables - crossing stitches in different ways creates variation
- Braided cables - multiple overlapping cables that weave together
Cable Patterns and Variations
Classic Cable Textures
Once you understand basic cables, designers combine them with other stitches to create stunning effects. The Flax Worsted is a beautifully constructed sweater that uses cables combined with clean stockinette. It works top-down in the round, which means you can try it on as you go.
Detailed Cable Work
The Honey Cowl creates a dense, waffle-like texture using slipped stitches. It's not technically a cable pattern, but it demonstrates how simple stitch techniques combine to create complex texture. This is perfect for practicing textured stitches without the cable-needle learning curve.
Mixed Technique Pieces
Many contemporary patterns mix cables with other details like colorwork, lace, or ribbing. The Classic Ribbed Hat focuses on fundamental ribbing technique, which is the workhorse of knitting. Learn to love ribbing and you unlock fitted garment construction.
Lace and Openwork
The Reyna shawl combines simple top-down construction with lace and mesh stitches. Yarn overs and decreases create the openwork. This pattern is beginner-friendly despite looking intricate.
Knitting Leg Warmers
Leg warmers are an ideal project for learning cables, practicing ribbing, or exploring textured stitches.
Why Leg Warmers Are Perfect Practice
Leg warmers have minimal shaping, so you can focus entirely on stitch work. They're small enough to finish quickly, giving you a sense of accomplishment. Even if your tension varies or you make mistakes, leg warmers hide imperfections better than fitted garments.
Basic Leg Warmer Construction
Most leg warmers follow this simple formula:
- Cast on roughly 32-48 stitches (depending on yarn weight)
- Work ribbing (usually 1-2 inches) for the top edge
- Work your chosen stitch pattern for 10-14 inches
- Work ribbing again for 1-2 inches
- Bind off
- Seam the back or use a suspended cast-on/bind-off for seamless construction
Stitch Pattern Ideas for Leg Warmers
Cables Only - vertical cables running the length of the leg warmer Ribbed - k2p2 or k3p2 ribbing for a classic look Mixed - cables with ribbed panels Twisted - twisted stitches create rope-like texture with less bulk than cables
Customizing Fit
Leg warmers wrap around your calf, so fit is flexible. If your gauge is slightly off, it's usually not catastrophic. You're aiming for roughly 8-10 inches around when slightly stretched.
Building Stitch Mastery
The difference between knitters who feel confident and those who don't often comes down to stitch familiarity. The more times you practice a stitch, the more automatic it becomes, and the less you need to think about technique.
Practice Through Projects
Rather than practicing stitches on gauge swatches (which many knitters abandon), choose patterns that feature the stitches you want to learn. Make it a real project.
The The World's Simplest Mittens is literally named for its straightforward construction. It's knit in the round using basic stitches, making it perfect for practicing seamless construction without complexity.
The Sockhead Slouch Hat combines ribbing with smooth stockinette, giving you practice with both fundamentals.
Embrace Pattern Variety
Each designer has their own style and explanation methods. Working through patterns from different designers exposes you to different approaches and terminology. This breadth makes you a more flexible, confident knitter.
Keep Notes
As you knit, jot down stitch-specific observations. If you find the decrease row confusing in one pattern but clear in another, note what made the difference. This personalized reference becomes invaluable.
Join the Community
Knitting communities (online forums, local yarn shops, knitting circles) provide encouragement and troubleshooting. Seeing the same stitch worked by multiple people gives you different perspectives and often clarifies something that confused you in written instructions.
Foundational Pattern Ideas
Hermione's Everyday Socks are beloved for good reason. They teach you top-down construction, decreasing for shaping, and creating a professional finish. The pattern works in the round and forces you to become comfortable working seamlessly.

The Age of Brass and Steam Kerchief
Find this pattern on HoneyBee
The Age of Brass and Steam Kerchief combines eyelets (openwork created with yarn overs) with simple decreases. It's a great intermediate step toward mastering lace.
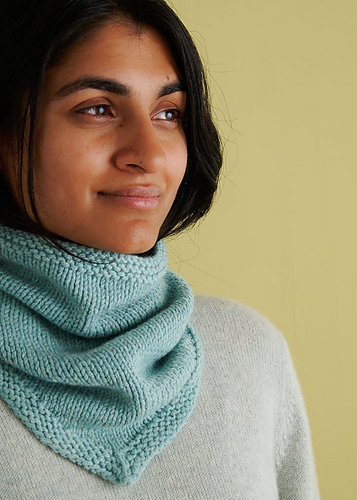
Find this pattern on HoneyBee
Bandana Cowl uses short rows, which is a game-changing technique once you understand it. Short rows allow you to create shaped fabric while working in the round.
Knitting Stitch FAQs
Q: I keep dropping stitches. What am I doing wrong? A: Tight tension often causes dropped stitches because you're fighting the yarn. Relax your grip slightly. Also, ensure you're fully inserting your needle before wrapping yarn. Partial insertion can cause stitches to slip off.
Q: How tight should my ribbing be? A: Ribbing should be snug but not strangling. If you cast on 40 stitches for k2p2 ribbing, your finished ribbing should stretch to roughly 8-10 inches comfortably. Practice until you find the tension that feels right.
Q: Are cables as hard as they look? A: No. Cables are genuinely simple: hold stitches on a cable needle, knit some stitches, knit the held stitches. The only challenge is managing a cable needle while juggling your working needles. Practice with a larger cable needle or toothpick until it feels natural.
Q: What does "work even" mean in a pattern? A: It means continue working the established stitch pattern without increasing or decreasing, until you reach the specified number of rows or inches.
Q: How do I know if I'm making a mistake? A: Count your stitches frequently, especially when you're learning. If you have a different count than you should, you've made a mistake. Use stitch markers at regular intervals (every 10-20 stitches) so you can quickly identify which section the error is in.
Q: What's the best way to fix a dropped stitch? A: For knit stitches, you can use a crochet hook to pick it up from below, working from bottom to top, picking up strand by strand. For purl stitches, work from the opposite direction. If it's more than a few rows down, you might need to frog back.
Q: Should I use different needle sizes for ribbing and stockinette? A: Some knitters do (using a smaller needle for ribbing to keep it tight), but it's not required. Experiment. If you like your ribbing tighter, a smaller needle helps. Just remember to change back to your main size for the stitch pattern.
Q: Can I knit cables over a long-term project? A: Yes. Cable projects are great for long-term knitting because the stitch pattern is so distinct that even if you put it down for months, you can easily see where you are and continue. Cables aren't dependent on reading charts or counting rows the way some patterns are.
Start Building Your Stitch Foundation
Mastering basic stitches opens every door in knitting. Whether you're working toward cables, exploring lace, or simply wanting to feel confident in any pattern you pick up, the fundamentals are your best investment.
Start with a project that interests you, use our patterns as your guide, and let stitch repetition do what it does best: build confidence and muscle memory.
Browse our full collection of free knitting patterns at HoneyBee. Find patterns that feature the stitches you want to master, and start creating with intention today.
More from the HoneyBee blog
Pattern round-ups, tutorials, and crafting inspiration from the HoneyBee community.
Read more articles